
Perfect Harmony Yoga Socks~a FREE crochet pattern by Kaleidoscope Art&Gifts

Look no further for a way to stylishly keep your feet warm during the transition into warmer months, in your favorite yoga and dance classes or just around the house. Work up these "quick to work up" and "fun to wear" yoga socks in no time and show them off!
By using this pattern you agree to the Pattern Terms of Use set forth by Kaleidoscope Art&Gifts
This pattern is the intellectual property of Lisa Jelle/Kaleidoscope Art&Gifts. Rewriting, reselling, distributing, or copying this pattern as your own, and/or without my consent is prohibited. If you wish to sell finished items produced from this pattern, feel free to do so. However, I ask that you please credit me as the pattern designer and link back to me as follows:
This pattern is the intellectual property of Lisa Jelle/Kaleidoscope Art&Gifts. Rewriting, reselling, distributing, or copying this pattern as your own, and/or without my consent is prohibited. If you wish to sell finished items produced from this pattern, feel free to do so. However, I ask that you please credit me as the pattern designer and link back to me as follows:
Pattern by Lisa Jelle/Kaleidoscope Art&Gifts
www.facebook.com/kaleidoscopeartngifts
www.etsy.com/shop/kaleidoscopeartgifts
www.ravelry.com/stores/lisa-jelle-kaleidoscope-artgifts-designs
Purchase the printable PDF version of this pattern HERE
Favorite it or show me your finished project on Ravelry HERE
YARN
DK (#3) Light Worsted weight. Approximately 100 yards.
MATERIALS
Crochet hooks by size: Women’s 6-7 ½=H/8 (5 mm). Women’s 8-9=I/9 (5.5 mm). Women’s 9-10=J/10 (6 mm) , stitch markers, tapestry needle
DIFFICULTY
Easy
SIZES
Women’s shoe sizes: 6-7 ½, 8-9 and 9-10
GAUGE
(with J hook) 4hdcs x 3 rows= 1”x1” square swatch
STITCH GUIDE
ch(s) - chain(s), sc - single crochet, hdc – half double crochet, dc - double crochet, fhdc – foundation half double crochet (tutorial here: http://www.mooglyblog.com/foundation-half-double-crochet/ ), st(s) - stitch(es), sl st – slip stitch
SPECIAL STITCHES
Shell: [(dc, ch1) 3 times, dc] in indicated stitch.
Spike: Insert hook into st indicated 1 round BELOW last, yarn over and pull up loop around previous round, yarn over and pull through all loops on hook.
NOTES
Beginning chains (ch1, ch3, etc.) do NOT count in final stitch counts UNLESS noted at beginning of round.
PATTERN (make TWO)
Ankle
Row 1: fhdc 32 (32sts)
Row 2: (wrong side facing) ch1, sc in next st, ch3, skip 1 st, sc in next st, *ch3, skip 3 sts, sc in next st, ch3, skip 1 st, sc in next st*, repeat from * - * across til 5 sts remain, ch3, skip 2 sts, sc in next st, ch1, skip 1 st, sc in last st (9 ch3 spaces)
Row 3: turn, ch1, sc in sc, *work shell into next ch3 SPACE, sc spike over next ch3 SPACE (skipping ONE st from previous row and working spike into NEXT st of previous row) into row below*, repeat from *-* across, sc in last st (5 shells created)
Row 4: turn, ch4 (counts as ‘dc, ch1’), sc in next ch1 SPACE, *ch3, skip ch1 SPACE, sc in next ch1 SPACE, ch3, sc in next ch1 SPACE*, repeat from *-* til TWO ch1 SPACES remain, ch3, skip next ch1 SPACE, sc in next ch1 SPACE, ch1, dc in last st (9 ch3 spaces)
Row 5: turn, ch3 (counts as dc), [dc, ch1, dc] in dc, *sc spike over next ch3 SPACE and into ch1 SPACE directly below in previous row, work shell into next ch3 SPACE*, repeat from *-* til ONE ch3 SPACE remains, sc spike over last ch3 SPACE and into ch1 SPACE directly below in previous row, [dc, ch1, TWO dcs] in THIRD ch of turning chain (this will create a shell when you connect the short ends into a ring later)
Row 6: turn, ch1, sc in dc, ch1, *sc in next ch1 SPACE, ch3, sc in next ch1 SPACE, ch3, skip next ch1 SPACE*, repeat from *-* til TWO ch1 SPACES remain, sc in next ch1 SPACE, ch3, sc in last ch1 SPACE, ch1, sc in top of turning chain (9 ch3 spaces)
Row 7: turn, ch1, sc in sc, *work shell into next ch3 SPACE, sc spike over next ch3 SPACE (skipping ONE st from previous row and working spike into NEXT st of previous row) into row below*, repeat from *-* til ONE ch3 SPACE remains, work shell into last ch3 SPACE, sc in last st
Bring both short ends together (with wrong side facing you) to form a ring, ch1, join sides together by slip stitching 11 times evenly along ends of rows through BOTH layers. Do NOT fasten off.
Heel opening (Note for 2nd sock ONLY: TURN before starting next round for correct seam placement)
Step 1(Round): ch2, rotate piece 90 degrees clockwise (counterclockwise if you’re left handed), hdc in each st around (32sts), join w/sl st in first st
Step 2(Row): ch2, turn, hdc in next 20 sts (leaving 12 sts unworked from previous round) (20sts)
Step 3(Row): ch2, turn, hdc around (20sts)
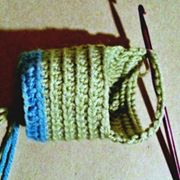
Step 4(Round): ch2, turn, hdc across (20sts), ch12, join w/ sl st on other side (being careful to NOT twist the chain) <see pic>
Foot
Round 5: ch1, sc in same st, sc around, join w/sl st in first st (32sts) (Note for 2nd sock ONLY: do NOT turn at beginning of Round 6, but DO turn for remaining rounds as stated)
Rounds 6-14: ch1, turn, sc around, join w/sl st in first st (32sts)
Fasten off and weave in all ends.
I hope you enjoyed the Perfect Harmony Yoga Socks pattern.
gorgeous ! thank you :-)
ReplyDeleteI wear a size 4-5 shoe; how would I modify the pattern to fit?
ReplyDeletei am too, i used a 4.5 mm hook. worked well the top slightly lose around ankle
DeleteI don't understand step four where it says to SC in each SC SPACE. Where are the SC SPACES? The spaces in between each DC that formed the shell? Is there a video for this pattern because that would be extremely helpful! Thanks in advance!
ReplyDeletein each hole...
DeleteIf you slightly stretch the piece after a row, you can see holes where you have chained three or chaned one. These are the sc spaces.
DeleteWhy do I always end up with 10 spaces? I have 32 stitches... ??
ReplyDeleteStep 3 is confusing the heck out of me
DeleteI had ten the first time, but I went back and started the row another stitch in, and made sure I only ended up with nine loops. Fudge it a bit if you have to. (My two cents, I'm not the designer.)
DeleteIt's driving me demented! I can't get nine now either despite having already made a pair correctly and having completed one of this pair! Suddenly, ten chain three spaces! WHY?! WWWWWHHYYYYY?!?!?
DeleteThis comment has been removed by the author.
DeleteI've done project very similar with the dropped stitches, then adding stitches to make a pocket. These should a quick project to complete. I'll keep you posted.. Thanks.
ReplyDeleteCould you do a video of this pattern please. I just can't seem to get this to work. Thanks
ReplyDeleteThe photo of the lavender socks at the top is a good guide to what you're going for. (The striped piece in the other photo must be some other pattern.) After you get the foundation row made, you do several rows in the shell, spike pattern; then you join those to make a tube, and work across the other side of your original foundation row (not the scalloped edge) to make the instep and foot part. Just remember to turn the rows or rounds when it says to, and keep to the 32 stitches around the foot. A stitch marker is handy for the sc rows.
DeleteDoes that help?
It really doesn't. I'm not a new crocheter by any means and I can't get past row 3. It just makes no sense........
Deletethaank you for the free pattern :)
ReplyDeleteit is indeed confusing at times, but doable.
photo helped me a lot.
I changed the way it is done, I start in round from the your end, then make shell pattern in round as well. no seam, more enjoyable to wear!
love
Has there been a video put out? I'm lost at step 3!!
ReplyDeleteI love this pattern, thank you! I too had some trouble understanding the top part, but I did my best and I'm really happy with how they turned out!
ReplyDeletethese are not easy at all!!!i am 53 and been crocheting since i was 8!! i dont understand where i am supposed to do the spike stitches. row 3 definitely needs a tutorial. i even went on utube to learn the spike stitch but row 3 has me lost and frustrated. crochet is supposed to be fun!!with so many people asking for a tutorial, i thought you would have made one. love the socks, but i wont be using your patterns any more. too confusing...and then you dont try to fix the problem after sooo many people had the same issue.
ReplyDeleteI thought the same! Super cute socks and I'm not a new crocheter. I have an Etsy shop! This pattern literally makes zero sense. Row three is like....... whaaaaaaaat???????
DeleteVery easy to understand! Love it! I think row 2 for the ankle should say (10 chain 3 spaces), I left the initial 10 and kept following the pattern and it came out beautifully and was 9 chain 3 spaces after words.
ReplyDeleteAfter 2 days i bought the pattern hopeing for pictures. Frog it... cant get it.
ReplyDeleteTried keeping it at ten shells fix. Stitched up fast.
DeleteI can't understand why there would be a difference in the two socks???
ReplyDeleteSo that the seams are on the inside.
DeleteAaaaah, that makes sense - thanks!
Delete:)
Gail
Yes, I think row 2 should just read 10 spaces.
ReplyDelete